How to Add Copyright to Blog Footer After Removing Powered by Blogger (Complete Guide)
March 20, 2020 | by Admin

How to Add Your Own Copyright to Blog Footer After Removing Powered by Blogger.
One of the things you would want to have on your blog as a professional blogger is your own copyright footer. Yes you will want to let people know that you know what you are doing and that the blog or website is copyrighted to you. Seriously it’s a great feeling.

I also know you may just have started this great journey of blogging and that’s why in all my posts I’m taking out time to help you become a professional.
In this post, I will show you how to add your own copyright to blog footer after removing powered by blogger. Just relax this will be fun as it won’t take you up to 3 minutes and you are done.
First what’s a footer copyright?
A copyright in the general sense legally indicates the owner of a creative work. Thus, a copyright footer indicate same that you own the blog. So you see it’s some worth important to your branding.
How to Add Copyright to Blog Footer?
In my recent post I showed us the few steps involved in removing “Powered by Blogger”. If Powered by Blogger is still showing on your blog footer then read This. After you have understood first how to remove that blogger footer or attribution, then it’s time you add your own footer copyright.
Steps by Steps How to Add Copyright to Blog Footer
1. Login to Blogger
2. Click on “theme” or “template”
3. Click on Edit HTML
4. Scroll down to the last part of your HTML codes until you see the closing body tag. A closing body tag has a less than sign follow by a forward slash sign and then closed with a greater than sign:
Look at my screenshots below:

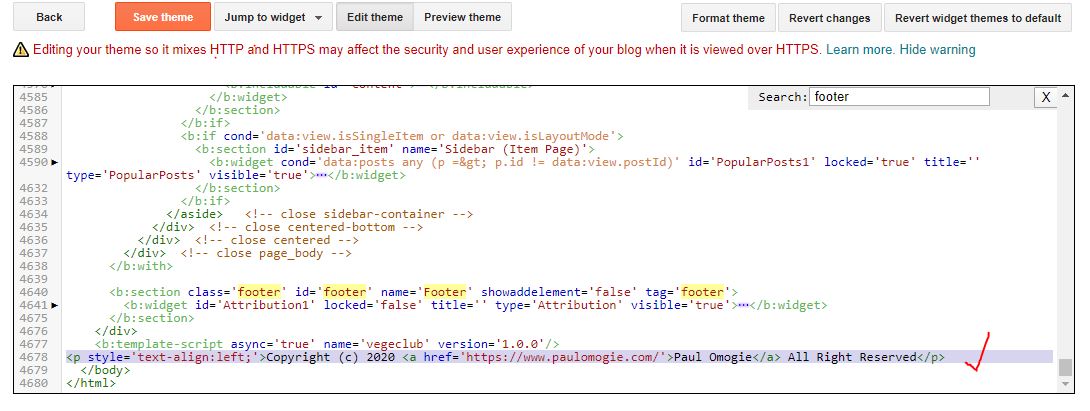
When you have logged in to Blogger and click on Edit HTML like I said earlier scroll to the very bottom of your codes to see the closing body tag as shown in my screenshot below:

Now just immediately before the closing body tag, add this codes: <p style=’text-align:center;’>Copyright (c) 2020 <a href=’https://www.paulomogie.com/’>Paul Omogie</a> All Right Reserved</p>
Please remember to put your own blog URL and your Blog name in Place of mine and my name, if not my name and website URL will be on your footer and I’m sure you don’t want to make such mistake. And just to add that you can also write “Power by” or whatever you want there in place of Copyright. Look at my screenshot below:
Once you are done, save it. Yes! You have done it. You have successfully branded your own website as the full owner.
Now visit your blog again you see something like this as have shown below:

That’s how your footer copyright should look like. Note you can always edit the year.
Now that you know how to add a footer copyright to your blog, I want you to go implement it, and drop your blog URL in the comment section below let me assess your progress, and please do share this post on social media. Thank you
Was this helpful? I recommend you read this articles that everybody is reading:
RELATED POSTS
View all

Custom Robots Header Tags Settings For Blogger (Complete Guide)
January 1, 2020 | by Admin
How To Write Useful And Readers’ Friendly Blog Articles?
February 22, 2020 | by Admin